| Cat
Food How to make healthy homemade catfood easy and cheap! We feed our cats home made cat food for their breakfast and dinner. This is much better than feeding commercial cat foods. Commercial pet foods are made from the carcasses of not only hoofed animals, but animals with paws as well. The carcasses are taken to a rendering plant where they are cut up and cooked - complete with intestines full of feces, flea collars, ear tags, Phenobarbital (which cannot be cooked out), cancers, fur, etc. Take a good look at your dog's kibbles and you will find fur stuck all through them. Read eye-opening articles on commercial pet foods at preciouspets.org and healthyhappydogs.com. Each week we prepare a week's worth of cat food for our 24 cats. They consume 160 lbs. of meat, mostly chicken, combined with about 50 lbs. Of vegetables per month. The cost is about $200 per month (approximately $8.50 per cat per month). We find that home made cat food is cheaper than commercial food and much better for our cats. We have been feeding our cats home made food since 2000. We have noticed a big difference in their behavior and energy levels. They are much happier cats. We have had full blood tests done on several cats and found that all their nutrient levels and organ functions were normal, showing that the home made cat food is adequately providing the nutrients they need. Some of our cats have also been x-rayed for bone evaluation, which proved to be normal as well. See where our cats go for their checkups with Dr. Becky Elfers. We are frequently asked about the tourine levels in our homemade catfood. Tourine occurs naturally in muscle tissue in sufficient levels for cats. Occasionally we add a bit of organ meat, such as beef heart, to the mix. We give thanks Pet-Grub.com for their wonderful website on how and why to make home made pet food. The recipe for our home made cat food is as follows. For a complete list of recipe ingredients, please refer to Pet-Grub.com. Home
made cat food recipe:
**The ratio of meat to vegetables, for cats, is 2/3 meat to 1/3 vegetables.**
1.
Remove most of the fat and skin from meat. Before serving, warm cat food by submerging bag or container in warm water. Do not microwave. Microwaving kills essential digestive enzymes.
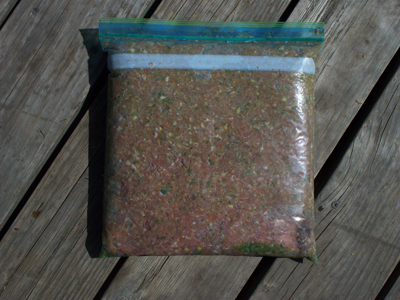
The final product: one 4 lb. bag of homemade catfood - YUM!
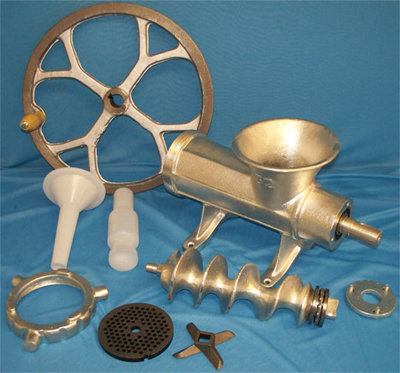
So you want to make your own catfood (or dogfood), but you don't have a grinder? Well CHECK THIS OUT!: As you know, we grind 160 lbs. Of meat and 50 lbs. Of veggies every month! That requires an industrial type grinder. Well, industrial type grinders are EXPENSIVE! And they usually require 3-phase electrical wiring. Most households only have two hot wires leading in from the grid. So, for under $150 and a little handiwork, you can have a grinder that will suck down a whole chicken leg (thigh and drumstick) with the bones, without hesitation! You need a #32 meat grinder with a V-blet pulley. An iron grinder is good, stainless steel is better. Don't get aluminum - you don't want that in your catfood and aluminum does not hold up as well. Here is a photo of the meat grinder you will need and the specifications:
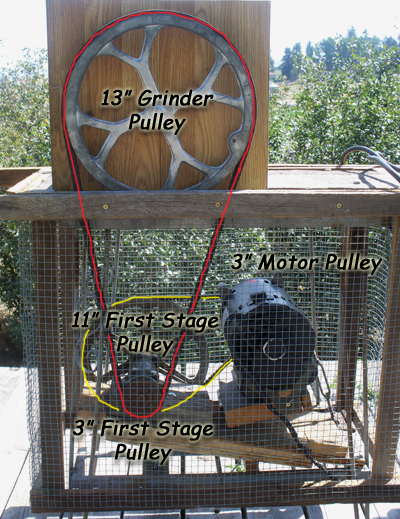
We bought our meat grinder from this Ebay store: Proline Parts. Just type in "meat grinder" in their store search to find the #32 size meat grinder pictured above. We paid under $100 for this grinder plus shipping. The other piece of equipment you will need for your meat grinder is a motor. We bought a 110/220 volt GE air compressor motor at a pawn shop for $35.00. You will need a pulley on the shaft of the motor with a groove that will match the pulley groove on your meat grinder. Most electric motors spin way to fast to run our meat grinder. The motor we bought spins at 3450 RPM. Even with a 3" pulley on the motor shaft the meat grinder would still spin at 940 RPM, so we had to reduce the speed even more by installing a 2 stage pulley reduction system. Starting with a 3" pulley on the motor, we ran a belt to an 11" pulley. The 11" pulley is on a shaft that has a 3" pulley on the other side. From this 3" pulley we ran a belt to the 13" meat grinder pulley. This reduced the final speed of the meat grinder to 220 RPM. This speed is just perfect. Keep in mind that whatever the RPM of the motor you buy for your meat grinder, you must reduce it to approximately 220 RPM. Here is a simple formula to help you obtain your reduction: RPM of motor x diameter of motor pulley ÷ diameter of meat grinder pulley (13") = RPM of meat grinder Formulas for 2 stage reduction: RPM
of motor x diameter of motor pulley ÷ diameter of first large reduction
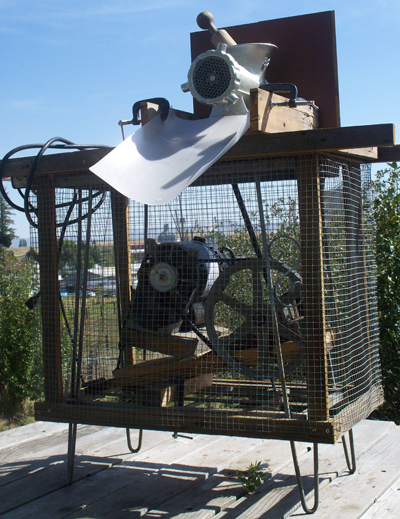
pulley= first RPM first RPM x diameter of first small reduction pulley ÷ diameter of meat grinder pulley (13") = final RPM reduction Now that you have a grinder and a motor, you will need to mount them onto a table. This is where the "handiwork" comes in. There are as many different ways to mount your motor/grinder system as there are tables to mount them on. Make sure to find or build a sturdy table that has a comfortable working height. Our table happens to be an old fish tank stand. We wrapped 1/2" wire screen around it to keep out stray tails and whiskers. We also put a board between the grinder and the grinder pulley for safety. Here is a photo of our setup:
Note the wooden push stick resting in the hopper of the grinder. We use this to push the food down into the grinder. We never push the food down with our hands! We clamped a thin teflon "cutting board" at the front of the grinder to catch the ground food and slide it into a tub below. We use black plastic concrete mixing tubs to mix the food in. They are heavy duty and work superbly! They can be purchased at Harbor Freight or Home Depot for around $7.00. Our motorized grinder setup works well for us since we make our catfood in such high volumes. You may only have one or just a few pets that you would like to make homemade food for. If this is the case, you don't really need to put a motor on your grinder, you can simply grind your pet's food by hand using the #32 grinder above which comes with a wooden handle that attaches to the grinder pulley. WARNING!
Do not get your hands near the grinder hopper! It could easily suck your hand
in! |